Tuesday, October 11, 2011

Abstract Day #2


This video shows some light painting (slow shutter speed) images.  It demonstrates where the light source moves while the shutter is open, and what the resulting image looks like:

Not all the pics are abstract in the vid, but it gives the general idea.


The above examples were all shot using slow shutter speeds and various light sources (x-mas lights, lamps, glow sticks).  By moving the camera or the light source you can create interesting imagery.


Today you have the entire (shorter for Wed) period to shoot more abstracts.  Your goal before Friday is to have:

  • 30 Amazing abstracts, each different from one another (from today, the weekend, and earlier)
  • 15 of these MUST be shot with a slow shutter speed
  • Your subject must NOT be recognizable, if I can tell what your picture is of, it is NOT abstract.
  • You should focus on lines, patterns, colors, shapes, textures, and creative angles.  Get close to your subject, focus on a portion of the object.  Hone in on an interesting area and make it the focal point.

Sunday, October 9, 2011

More abstracts... with slow shutters!

by slowing down the shutter on your camera (allowing things to move while the camera is taking the image) can result in some amazing images... Toady we will be shooting a few    more abstract images, but adding slow shutter speeds into the mix to aid in improving our shooting adventure.


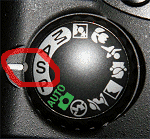
We will be setting the shutter speed manually!  This will allow you to either move the camera or the action/subject while the camera is taking the pic, resulting in an AMAZING abstract pic!!!


We want to change the 1/2.5 which is the shutter speed.  By setting this to something slower than 1/30 of a second we will be able to see the movement of the action/camera in our pic.  Spend the shooting time today experimenting with speeds from 1/2 to 25 and see the results.  Your goal is to understand the effect shutter speeds have on your images.  You will need this for your shooting day on Wed/Thursday.

vignette

selective focus

Editing Abstract Pics Day #1

Editing Abstracts
Tools to edit your abstracts:

  • Vignette - learn today 
  • Selective Focus - learn today 
  • Contrast 
  • Saturation 
  • Photo Filters 
  • Fill Adjustment Layers 


Remember to make your images unique, creative and interesting. If you can obviously tell what it is, it is NOT abstract, choose another. Be ware of the entire image being out of focus, something should be crisp in focus (unless super slow shutter).

 SELECTIVE FOCUS -
 - open your image
- select what you want to stay in focus (use the lasso or marquee tool)
- choose select > modify > feather (set to 100 or so)
- select > inverse
- press apple "J" to make a new layer from this selection
- choose select > deselct
- filter > blur > Gaussian Blur > set to 4 - 15

 ***optional > lower the layer opacity to reveal more of the sharp image underneath   (on the layers palette)


 VIGNETTE -
- select what you want to keep properly exposed (this should be a general selection of an area, not a specific object)
- select > modify > feather (again set to 100 or so)
- select > inverse
- press "D" on your keyboard to go back to default colors
- make a new layer (choose layer > new layer)
- fill our selection with black
- select > deselct
- filter > blur > G.Blue = 60 - 150
- lower the opacity to 15 to 30 % (on the layers palette)

Wednesday, October 5, 2011

Abstract examples:


hallway


ABSTRACTS!!!

Definition: Abstract Art is defined as: any art in which real objects in nature are represented in a way that wholly or partially neglects their true appearance and expresses it in a form of sometimes unrecognizable patterns of lines, colors and shapes.


lamp


carpet

abstract photography - palm leavesfern


Task

Inside the classroom, woodshop and autoshop, your task is to (without touching/moving/manipulating anything) find 15 interesting patterns, textures, colors, lines, shapes etc. to photograph.

Tips:

  • get close to your subject
  • use unique angles
  • focus on making something ordinary extraordinary
  • the object you photograph should NOT be recognizable in your image, just focus on the abstract.