This site is a tool for students in Digital Photo at Shorecrest. It is used to give you useful information about our class, assignments, and due dates.
Tuesday, September 29, 2009
shutter speeds...
http://digital-photography-school.com/shutter-speed
http://www.ephotozine.com/article/Camera-Shutter-Speeds-explained-4794
http://www.takegreatpictures.com/slow_shutter_speeds.fci
http://coolandspicy.net/2009/04/some-slow-shutter-fun/
http://www.picpot.co.uk/tips-for-abstract-photography-5.html
http://4pphotoblog.blogspot.com/2008/05/shutter-painting.html
Thursday, September 24, 2009
ABSTRACTS!!!
ABSTRACTS!!!
here are some links to online galleries:
http://images.google.com/images?q=abstract+pictures&ie=UTF-8&oe=utf-8&rls=org.mozilla:en-US:official&client=firefox-a&um=1
http://www.earth-photography.com/Miscellaneous/Abstract
http://photo.net/bboard/pc2?topic_id=1481&category=Abstract
http://www.123rf.com/stock-photo/abstract.html
a gallery of recognizable but interesting abstracts:
http://www.shutterpoint.com/Photos-BrowseCat.cfm?cat_id=33
abstracts from Cambodia:
http://www.totku.com/
abstracts in nature:
http://www.markraymondmason.com/galleries.php
Today we will begin shooting, looking for abstract images. Look for patterns, lines, shapes, colors, textures, shadows, get close up to your subject, try funky camera angles, and think outside of the box. Have a little fun, you can find abstract images EVERYWHERE.
Tuesday, September 22, 2009
Photoshop tools you NEED to know...
Rectangular Marquee Tool (M)
Use this tool to make selections on your image, in a rectangular shape. This changes the area of your image that is affected by other tools or actions to be within the defined shape. Holding the [Shift] key while dragging your selection, restricts the shape to a perfect square. Holding the [Alt] key while dragging sets the center of the rectangle to where your cursor started.
Move Tool (V)
Use this tool to, well, move things. Usually you use it to move a Layer around after it has been placed. Hold the [Shift] key to limit the movements to vertical/horizontal.
Polygon Lasso Tool (L)
Ok, this should be the Lasso Tool, but I use the Polygon Lasso a lot more often. Use this to draw selections in whatever shape you would like. To close the selection, either click on the beginning point (you’ll see the cursor change when you’re on it), or just double-click. When holding the [Ctrl] key, you’ll see the cursor change, and the next time you click, it will close your selection.
Magic Wand Tool (W)
Use this to select a color range. It will select the block of color, or transparency, based on wherever you click. In the Options Bar at the top, you can change the Tolerance to make your selections more/less precise.
Crop Tool (C)
The Crop Tool works similarly to the Rectangular Marquee tool (see above if you have no short-term memory). The difference is when you press the [Enter/Return] key, it crops your image to the size of the box. Any information that was on the outside of the box is now gone. Not permanently, you can still undo.
Clone Stamp Tool (S)
This is a very useful tool, if used wisely. Choose your brush size, then while holding down the alt/option key on the keyboard, click on the area you want to clone, release the alt/option key and now click and drag over the area you want to replaced. It’s a direct copy of the information from the first selected area to the second.
In addition to these tools you should be familiar with all corrections under IMAGE > ADJUSTMENTS to improve your images...
Tuesday, September 15, 2009
Landscape Task...
Find a landscape YOU like...
http://learn.shorelineschools.org/shorecrest/bstory/index.php?section=discussion
Landscape Tips
http://www.great-landscape-photography.com/landscape-photography-tips.html
Landscapes
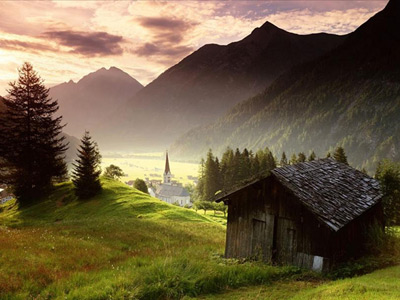
Landscape comprises the visible features of an area of land, including physical elements such as landforms, living elements of flora and fauna, abstract elements like lighting and weather conditions, and human elements like human activity and the built environment.
Please do not center the horizon line and try to show something in the foreground, mid-ground, and background.
The trick to landscapes is to show depth:
the secret to getting your images to show depth is to include for/middle/background all in the same image. Let it lead the viewer from something up close to things far away... similar to the leading lines we just shot.
epic examples:
http://www.outdoor-photos.com/
Turn in Composition Shooting...
Thursday, September 10, 2009
More on Composition...
http://www.microsoft.com/windowsxp/using/digitalphotography/learnmore/composition.mspx
http://knol.google.com/k/yanik-chauvin/photography-composition-an-introduction/2rcdarvscszjb/2#
http://www.amateursnapper.com/photography/10-top-photography-composition-rules
TAKE NOTES! you need to have notes which include definitions for:
- leading lines
- frame withing a frame
- balance
- perspective/viewpoint
- cropping
- background
- depth
- Symmetry & patterns
- rule of thirds (you should know this by now!)
Your task (and homework):
Shoot today looking for leading lines, frame withing a frame, balance, & perspective/viewpoint. You will be turning in 16 INTERESTING shots using one of the four techniques described above in each image. Expect that you will take 30-40 pictures to result in 12 good ones.
You do not have to shoot outside.
Please use rule of thirds and remember that the subject should fill the frame. Remember you will take anywhere from 30-40 pictures. However, you will only need to turn in your best four pictures for each composition.
Tuesday, September 8, 2009
How to make a contact sheet...
In Photoshop CS3:
* Create a new folder on your desktop with your pictures.
* Open Photoshop CS3.
* Select File>Automate>Contact Sheet II
* Select on Folder and choose the folder your created.
* Make sure the image size is 8*10 inches.
* The resolution should be 300.
* Columns=4 and rows=5.
* Click OK.
* File>Save as a jpeg
Drop contacts shet into the STAFF server period 1 and make sure you use the naming convention. Contact sheets and other assignments without the naming convention will not be graded.
Compositional Tips Part #1
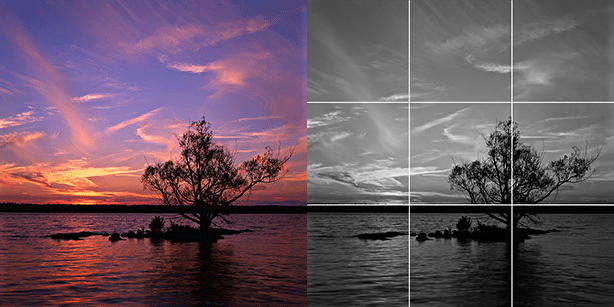
- The rule of thirds: an image can be divided into nine equal parts by two equally-spaced horizontal lines and two equally-spaced vertical lines. The four points formed by the intersections of these lines can be used to align features in the image. aligning a photograph with these points creates more tension, energy and interest in the photo than simply centering the feature would.
- Shooting from unique angles: none of your images should ever be taken from 5'8" - 6'2". That is, squat down, stand on top of something, crouch behind something, move around to find a different and unique perspective at your subject. Anyone can stand there and take a snap shot, show us your perspective by thinking outside of that box.