Wednesday, March 30, 2011

more examples


more on sequences

To import your pics into one document on different layers:


To align all your layers, select all the layers, then:

action sequence with a mask layer


http://www.youtube.com/watch?v=ReDRMX2-8n4&NR=1&feature=fvwp

Editing Tips

Don't forget shadows, if you leave out the shadow your sequence will look odd:


On PMs, once you have merged the images, then flatten the image and edit as you would a landscape:

Monday, March 28, 2011

Monday/Tuesday merger shooting!


At the start of class please import your weekend homework (3 sequences or merges). You will have time next class period to stitch these together. Just import them so I can see you took pics over the weekend, then you may check out to shoot.

TODAY: All period shooting day for sequences/merges. Remember that the images should not only function technically, but should also be interesting and captivating! Find an interesting activity or locale to shoot. Consider your composition. Be conscious of what you have your camera set on. Good luck!

Thursday, March 24, 2011

http://livedocs.adobe.com/en_US/Photoshop/10.0/help.html?content=WSfd1234e1c4b69f30ea53e41001031ab64-75e4.html

Tuesday, March 22, 2011

action sequence

http://www.mdgraphics.ca/articles/photoshop-action-sequence.php

Monday, March 21, 2011

Bring objects or ideas for ACTION on Tue/Wed

Snowboard Sequence Photography 25 Beautiful Examples of Action Sequence Photography

for your one pic

Please edit your image. You will turn in your amazing image as well as your original on a contact sheet of one column and two rows.

Also, please answer these questions regarding your image.

Weekend Homework

Your task this weekend was to take one picture. Something you think is interesting, unique, creative, and awesome!

Tuesday, March 15, 2011

LIGHT SABERS!!!

Time to geek out! Star Wars style!


Get a Picture!!

Take a picture of yourself in an action scene. We have pipes that will act as the basis for your sabers. Import your best pic.

Make an new Layer

Hold CTRL+SHIFT+N.
Or go to LAYER-NEW-LAYER.
That will bring up the New Layer window.
Call it like Lightsaber or thing.
You can choose your color for the layer.
Hit OK and your layer will be displayed in the layer box

Brushes

On the toolbox press the brush button.
Go to BRUSH box on top where brush is displayed.
Click on the brush, that will bring an box with layers.
Select the brush with outside blur.
If the brush isnt there, choose basic brushes from the preset menu.

Lets Begin!!

Once brush selected, click on the bottom of the stick and hold SHIFT.
Go to the top of the stick ( in my case outside the image,) and click again.
You see you have an nice blured core!
You can let go shift.

Effects

Now double click your layer.
In my case; Lightsaber.
That will bring out the layer style menu.
Click on Outer Glow and you will see a little yellow colored box.
Click on that box and choose your color.
I will do Green.

Then go to the Opacity Line and make that 100%.
Your saber will be brighter.

Go to the Contour box displayed on the bottom of the window.
select the half round one.
That will make your saber even more Blurry.

Done!

Hit OK and you are done!!!!
This effect will make your Pic's more reality!

SOME TIPS;

--If you want more sabers from the same color, dont make new layers.
Just repeat step 4!

--Try to make your sabers the same diameter as the stick.

--Use small sticks.

Monday, March 14, 2011

Black and White

The Black & White command lets you convert a color image to grayscale while maintaining full control over how individual colors are converted. You can also tint the grayscale by applying a color tone to the image, for example to create a sepia effect. Black & White functions like the Channel Mixer, which also converts color images to monochrome while allowing you to adjust color channel input.

For a video on converting color images to black & white, see www.adobe.com/go/vid0017.

  1. Choose Image > Adjustments > Black & White. Photoshop performs a default grayscale conversion based on the color mix in the image.
  2. Manually adjust the conversion using the color sliders, apply an Auto conversion, or select a previously saved custom mix.
    Preset
    Select a predefined grayscale mix or a previously saved mix. To save a mix, choose Save Preset from the palette menu.
    Auto
    Sets a grayscale mix based on the image’s color values, maximizing the distribution of gray values. The Auto mix often produces excellent results, or can be used as the starting point for tweaking gray values using the color sliders.
    Color Sliders
    Adjust the gray tones of specific colors in an image. Drag a slider left to darken or right to lighten the gray tones of an image’s original color.
    • The grayscale ramps show how dark a color component will become in the grayscale conversion.

    • The mouse pointer changes to an eyedropper as you move it over the image. Click and hold on an image area to highlight the color chip for the predominant color at that location. Click and drag to shift the color slider for that color, making it darker or brighter in the image. Click and release to highlight the text box for the selected slider.

    • Alt-click (Windows) or Option-click (Mac OS) a color chip to reset an individual slider to its initial setting. Press Alt (Windows) or Option (Mac OS) to turn the Cancel button to Reset, which resets all color sliders.

    Preview
    Deselect to view the image in its original color mode.
  3. To apply a color tone to the grayscale, select the Tint option and adjust the Hue and Saturation sliders as needed. The Hue slider changes the tint color, the Saturation slider makes the color more or less concentrated. Click the color chip to open the Color Picker and further fine tune the tint color.

Tattoo!!!

Today we will be converting images to black and white and submitting them to tattoo at sc-tattoo.com

The steps to do so are:

  • convert pic to black and what
  • adjust image size to be 8x10 or so
  • save as a .jpeg file
  • be sure it is no larger than 3MB or it will crash the tattoo server!

Friday, March 11, 2011

Thursday, March 10, 2011

ABSTRACT EDITS

You will be turning in 10 edited abstract pics. These needs to be some combination of slow shutter speed pics and standard exposure abstracts. Each pic should be edited to improve its aesthetic qualities and NO images should be obvious or recognizable. Remember, abstract photos are those which take ordinary things and make them extraordinary by focusing in on patterns, lines, textures, colors etc.

You will turn in a folder of your 10 full size pics to the classes folder.

Tuesday, March 8, 2011

So what are shutter speeds?

What you can do with shutter speed is freeze motion with a fast shutter speed or capture movement with a slow shutter speed. Flowing water looks silky smooth at speeds slower than 1/8th of a second (with a tripod), while you can freeze water in time with fast shutter speeds. The same thing goes for hip hop dancers.


Also, an important side note is that there is a rule for getting sharp images: 1/focal length. So if you have a 50mm lens then you'd need at least 1/50th of a second for your picture to not be blurry, and if you're using a digital SLR then there is a crop value (minus a few exceptions) of 1.5/1.6 so your 50mm lens is a 75~80mm lens, which means that you need a shutter speed of at least 1/80th of a second to get a sharp image.

Summary: Fast shutter speed = freeze action. Slow shutter speed (w/ tripod) = silky flowing water.

Abstract manipulation with the camera

by slowing down the shutter on your camera (allowing things to move while the camera is taking the image) can result in some amazing images... below are some links, full of info and examples. Toady we will be shooting more abstract images, but adding slow shutter speeds into the mix to aid in improving our shooting adventure.

http://digital-photography-school.com/shutter-speed

http://www.ephotozine.com/article/Camera-Shutter-Speeds-explained-4794

http://www.takegreatpictures.com/slow_shutter_speeds.fci

http://coolandspicy.net/2009/04/some-slow-shutter-fun/


http://www.picpot.co.uk/tips-for-abstract-photography-5.html

http://4pphotoblog.blogspot.com/2008/05/shutter-painting.html

Monday, March 7, 2011

notes on PS

SELECTIVE FOCUS -

- open your image
- select what you want to stay in focus
- select > modify > feather
- select > inverse
- apple "J"
- filter > blur > G.Blur > 4 - 15
- ***optional > lower the layer opacity

VIGNETTE -
- select what you want to keep properly exposed.
- select > modify > feather
- select > inverse
- press D
- make a new layer
- fill our selection with black
- select > deselct
- filter > blur > G.Blue = 60 - 150
- lower the opacity

Editing Abstracts

Tools to edit your abstracts:
  • Vignette - learn today
  • Selective Focus - learn today
  • Contrast
  • Saturation
  • Photo Filters
  • Fill Adjustment Layers
Remember to make your images unique, creative and interesting. If you can obviously tell what it is, it is NOT abstract, choose another. Be ware of the entire image being out of focus, something should be crisp in focus (unless super slow shutter).

Thursday, March 3, 2011

weekend abstract homework


20 abstract pics of at least 8 different objects, places or things

abstract info

Abstract photography has as many definitions as there are abstract photographers. It's a notoriously difficult to pin down. Nor are there any set rules as to what makes “good” abstract photography, even less so than with most art. People describe “just liking” a certain photograph without even knowing why, while others might just shrug their shoulders. The sheer subjectivity of the form makes it even more difficult define.

Generally, abstract photography is the art of taking photographs with no particular subject or meaning. Probably the most common variety is to make one subject look like another: rust made to look like a sunbursts, folds in plastic like the aurora borealis. A common motif in abstract photography is to make the familiar, the everyday, seem as strange and foreign as a city on Alpha Centauri, or a town of Dr Seuss.

Indeed, it is argued by many that abstract photography is the most demanding form of photography due to the fantastic creative and imaginative processes that go into creating abstract photos.

Examples of Abstract Photos

Attention To Color & Texture

Many abstract photos pay especial attention to color—or the lack thereof. Presenting two otherwise unlike objects with the same or contrasting colors is a common type of abstract photographs, like the red of a dress juxtaposed next to a stop sign, or a single yellow leaf amongst dozens of fallen green ones. Repeating patterns—or a break in repetition—is another common motif in abstract photography, from fractal patterns in trees to a footstep interrupting ripples in the sand.

Focus, Exposure & More: Break The Mold

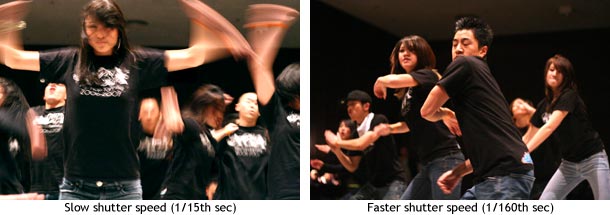
Forget the rules. Your subject—or lack thereof—does not have to be in focus. Nor does it have to be exposed so it appears perfectly unblurred. Extreme f-stops can similarly lead to fascinating effects not found in other forms of photography, revealing forms, shapes, patterns, color, at different focii that would not otherwise be obvious by our eyes. Show the world in a different light—or a different exposure, f-stop, ISO, whatever, just try to find connections where you or anyone else might not have found them before, harmonies and dissonances in the shapes and forms around you.

ABSTRACTS!


ABSTRACTS!!!

Definition: Abstract Art is defined as: any art in which real objects in nature are represented in a way that wholly or partially neglects their true appearance and expresses it in a form of sometimes unrecognizable patterns of lines, colors and shapes.


abstract photography - palm leaves

Landscape Turn in...

You should have already submitted your contact sheet of 40+ amazing landscapes. Today you will turn in your edited pics. Please turn in:
  • A folder - follow the naming convention with landscape as the project title.
  • include your 10 pics
  • label your favorite as such.

Tuesday, March 1, 2011

example

Before After
Before After Adjustment Layers


Before Image

With a Levels Adjustment Layer

What the layers for this looks like
In the image above, the sky is slightly washed out and I prefer to have it darker. If I darkened the whole image, I'd be making the mountains in the bottom half too dark and would lose detail. I apply a Levels Adjustment layer (named Levels 1) and adjust the levels to darken the sky. Unfortunately, because the mask attached to this adjustment layer is all white, this effect is applied to the whole image and my mountains are too dark. The top layer (Levels 1) is a Levels Adjustment layer (you can tell by the icon). The attached mask (which is all white) tells Photoshop to apply the adjustment to the whole image.
I need to Mask the mountains from this adjustment. With a Levels Adjustment Layer and mask What the layers for this looks like
I use a large, soft-edge paintbrush set to pure black and paint over the mountains on the mask, which removes the effect of the Adjustment Layer in those areas. This returns the mountains to their original tone.


Editing Landscapes

You are going to be editing 10 landscapes to make them AMAZING!!! You will have most of the period today (Tuesday/Wed) and some of Thursday/Friday.

Skills you have leaned to edit your pics:
  • high pass filter - sharpens pic (new today)
  • fill adjustment layer - to adjust portions
  • Image > Adjustments (colors, photo filters, saturation, exposure)
  • infinite selection tools to edit portions of images
  • cropping
  • correcting horizon line angle
  • clone stamp for out of place objects
Each image should be exposed well!

Sharpen your landscapes


http://www.photoshopessentials.com/photo-editing/sharpen-high-pass

Editing your landscapes

Click here for a tutorial covering how fill adjustment layers work for landscapes...

Apply Adjustment Layers from the Layers pallette

The types of Adjustment Layers you can apply.