- Put all 8 pics on ONE CONTACT SHEET OF 4 X 2.
- SAVE IT AS A .JPG.
- TURN INTO THE CLASSES FOLDER
Thursday, September 30, 2010
Shutter and Aperture to turn in...
Make a contact sheet of your favorite 4 images from each day (8 total)... you pick, what was interesting, what worked, what is in focus, blurred, shows motions, depth of field, etc.
Depth of Field
Although print size and viewing distance are important factors which influence how large the circle of confusion appears to our eyes, aperture and focal distance are the two main factors that determine how big the circle of confusion will be on your camera's sensor. Larger apertures (smaller F-stop number) and closer focal distances produce a shallower depth of field. The following depth of field test was taken with the same focus distance and a 200 mm lens (320 mm field of view on a 35 mm camera), but with various apertures:
 |  |  |
| f/8.0 | f/5.6 | f/2.8 |
Aperture and Depth of Field
Maximum and minimum apertures
Further information: Lens speed
The specifications for a given lens typically include the minimum and maximum apertures, such as for example f/22 - f/1.4. In this case f/22 is the smallest, or minimum aperture opening, and f/1.4 is the widest, or maximum aperture. The maximum aperture tends to be of most interest, and is always included when describing a lens. This value is also known as the lens speed, because it directly affects the exposure time. The aperture is proportional to the square root of accepted light, and thus inversely proportional to the square root of required exposure time, such that an aperture of f/2 allows for exposure times one quarter that of f/4.

Aperture values wider than f/2.8 are typically known as "fast" lenses, though this has changed historically (in the past, wider than f/6 was considered fast, for example by the 1911 Encyclopaedia Britannica). The fastest lenses in general production are f/1.2 or f/1.4, with more at f/1.8 and f/2.0, and many at f/2.8 or slower; f/1.0 is unusual, though sees some use.
In exceptional circumstances lenses can have f-numbers below f/1.0; see lens speed: fast lenses for a detailed list. For instance, in photography, both the current Leica Noctilux-M 50mm ASPH and a 1960's-era Canon 50mm rangefinder lens have a maximum aperture of f/0.95. Such lenses tend to be optically exotic and very expensive; at launch, in September 2008, the Leica Noctilux retailed for $11,000.[5] Professional lenses for some movie cameras have f-numbers as low as f/0.75. Stanley Kubrick's film Barry Lyndon has scenes shot with the largest relative aperture in film history: f/0.7. Beyond the expense, these lenses have limited application due to the correspondingly shallower depth of field – the scene must either be shallow, shot from a distance, or will be significantly defocused, though this may be a desired effect.
Zoom lenses typically have a maximum aperture (minimum f-number) of f/2.8 to f/6.3 through their range. High-end lenses will have a constant aperture, such as f/2.8 or f/4, which means that the relative aperture will stay the same throughout the zoom range. A more typical consumer zoom will have a variable relative aperture, since it is harder and more expensive to keep the effective aperture proportional to focal length at long focal lengths; f/3.5 to f/5.6 is an example of a common variable aperture range in a consumer zoom lens.
By contrast, the minimum aperture does not depend on the focal length – it is limited by how narrowly the aperture closes, not the lens design – and is instead generally chosen based on practicality: very small apertures have lower sharpness due to diffraction, while the added depth of field is not generally useful, and thus there is generally little benefit in using such apertures. Accordingly, DSLR lens typically have minimum aperture of f/16, f/22, or f/32, while large format may go down to f/64, as reflected in the name of Group f/64. Depth of field is a significant concern in macro photography, however, and there one sees smaller apertures. For example, the Canon MP-E 65mm can have effective aperture (due to magnification) as small as f/96.
 f/32 - narrow aperture and slow shutter speed |  f/5.6 - wide aperture and fast shutter speed |
Tuesday, September 28, 2010
$20 fee is over due!!!
Materials fees were due by Friday September 24th. Turn your fee in to Ms. Denny's office to improve your grade, an east 25 pts.
grade will be updated online Thursday and reflect this fee/grade. If you need a scholarship please come and see me.
grade will be updated online Thursday and reflect this fee/grade. If you need a scholarship please come and see me.
pics to take today
 Please set your camera into Shutter Priority Mode (S on the clickwheel). This will allow you to adjust the shutter and the camera will automatically adjust the aperture.
You will set up 5 actions scenes and shoot each of them at the following:
- 1/15
- 1/60
- 1/250
To adjust the shutter speed you will be using the thumb click wheel:


Tips: try and repeat the same action (speed, focus etc).
more on shutter and aperture
The aperture controls the amount of light allowed into your camera...

The shutter controls how long this light is allowed in...

These two factors work together to create images that are properly exposed.
more info:
Aperture
The aperture is the size of the lens opening. It controls the amount of light let in: a larger aperture lets in more light, while a smaller aperture lets in less light.
The shutter controls how long this light is allowed in...
These two factors work together to create images that are properly exposed.
more info:
Aperture
The aperture is the size of the lens opening. It controls the amount of light let in: a larger aperture lets in more light, while a smaller aperture lets in less light.
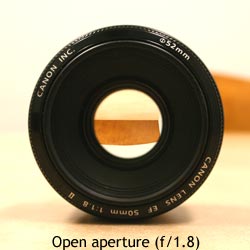
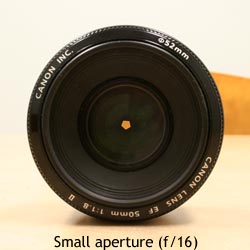
An aperture is made out of aperture blades (usually five to nine) that form a rough circle to control the size of the opening, and therefore the amount of light let in. The size of the opening is that f/number that I described earlier. Basically, that f/number is a ratio of focal length to aperture diameter. Do you need to know this? Not really, except you should keep in mind that the aperture is a ratio.
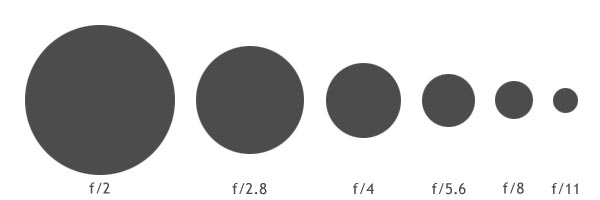
Simply put, the smaller the f/number, the larger the opening (f/3.5 = 1/3.5 = 0.286; f/16 = 1/16 = 0.0625). That's all I'm going to explain here because it's an extremely complicated topic and you don't really need to know it. There's plenty of places on the web that explain it in great scientific detail; this is not one of them. The following is a diagram of f-stops. Each f-stop (or just a stop) lets in half the amount of light of the previous f-stop.
Now, lets get on to why this matters and how it can change what your picture looks like. Basically, a larger aperture (lower f/number) will have your subject in focus, and everything in front of and behind it blurry. A smaller aperture will have your subject in focus and everything in front of and behind it quite focused as well. Take a look at the following diagram; the further apart the lines are, the more out of focus something is:
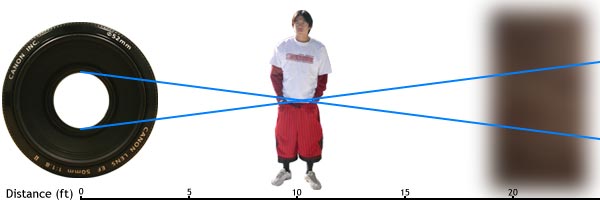
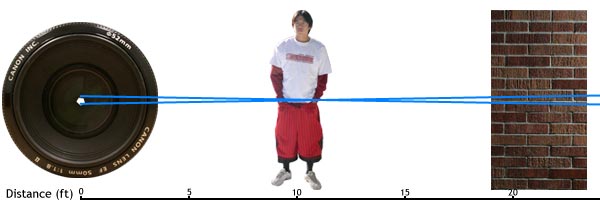
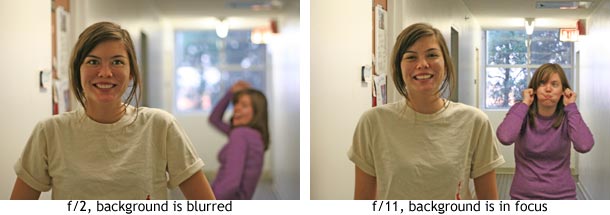
Summary: Large aperture, background out of focus; small aperture, everything in focus. (Large aperture = smaller f-number, small aperture = larger f-number).
Shutter Speed
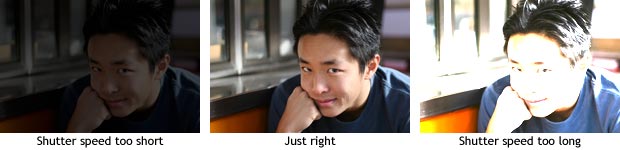
Your camera judges this for you, but you can manually set it as well. The shutter speed is the other (usually larger) number that isn't the aperture value. This number is actually a fraction, so if you see a shutter speed of 4000, it's actually 1/4000th of a second, while a value of 200 is 1/200th of a second. Now, remember how I mentioned stops in the aperture section? Well, they also apply to shutter speed, but in a slightly different way. By halving the time of exposure, you're letting in half the amount of light (so if you go from 1/2000 sec to 1/4000 sec, then you're letting in half the light). The opposite is true for doubling the exposure time.
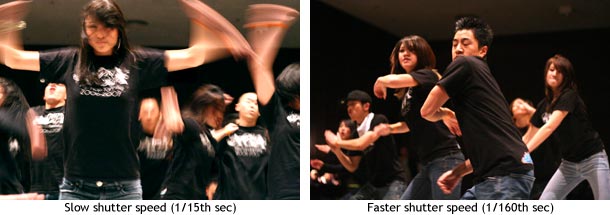
What you can do with shutter speed is freeze motion with a fast shutter speed or capture movement with a slow shutter speed. Flowing water looks silky smooth at speeds slower than 1/8th of a second (with a tripod), while you can freeze water in time with fast shutter speeds. The same thing goes for hip hop dancers.
Also, an important side note is that there is a rule for getting sharp images: 1/focal length. So if you have a 50mm lens then you'd need at least 1/50th of a second for your picture to not be blurry, and if you're using a digital SLR then there is a crop value (minus a few exceptions) of 1.5/1.6 so your 50mm lens is a 75~80mm lens, which means that you need a shutter speed of at least 1/80th of a second to get a sharp image.
Summary: Fast shutter speed = freeze action. Slow shutter speed (w/ tripod) = silky flowing water.
How Aperture and Shutter Speed are Related
Aperture and shutter speed are bound together like an old married couple. For the same scene, if you open the aperture, you increase the shutter speed, and if you close down the aperture, you decrease the shutter speed. Think of a bucket of water with a hole in the bottom. If you have a large hole in the bottom of the bucket (large aperture), water will drain out quickly (fast shutter speed). Conversely, for the same amount of water, if you have a small hole in the bottom of the bucket (small aperture), the water will drain out slowly (slow shutter speed).
Remember how I mentioned stops earlier? Well one aperture stop is equivalent to one shutter speed stop, therefore if you open up your aperture one stop brighter (say from f/8 to f/5.6), and increased your shutter speed to one stop darker (like 1/250 to 1/500), then you would get the same exposure. So f/8 @ 1/250 is equivalent to f/5.6 at 1/500. This is the theory of equivalent exposures.
Summary: Larger aperture, faster shutter speed; smaller aperture, slower shutter speed. Increase aperture by one stop and decrease shutter speed by one stop = equivalent exposure (and vice versa).
There are a lot of uses for aperture and shutter speed. One of which is of course the background blur that everyone always wants to know how to get. Another thing you can do with a slow shutter speed is a night shot, which can give very interesting results. Check them out.
shutter speeds
 s
s
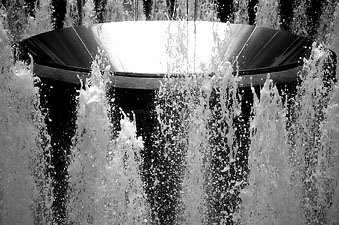
Here are two photo of the same fountain shot at different shutter speeds. The top picture was taken at a fairly fast speed, about 1/500th of a second and has frozen the drops of water in mid air.
The bottom photo was taken using a slower shutter speed, in other words the shutter was open for a longer time, which has allowed the fast moving water to blur a little. I don't remember what the shutter speed setting was for this shot but I would guess it was about 1/30th of a second because the camera was handheld and the bowl is quite sharp. At shutter speeds slower than 1/30th of a second it is quite difficult to hold the camera steady enough to get a sharp image. You need to use a tripod.
The static bowl of the fountain remains the same in both photos.
Whilst adjusting the shutter speed it is necessary to adjust the aperture in the opposite direction to ensure that the same amount of exposure is given to the film. If you use the 'shutter speed priority' setting on your camera this will be done automatically for you.

Thursday, September 23, 2010
What to turn in...


IN ONE FOLDER NAMED YOUR NAME_LANDSCAPES PLEASE TURN IN:
- 2 amazing landscapes full size in .jpeg format
- a contact sheet of 10 edited fantastic landscapes
- a contact sheet of 40+ landscapes from 4+ locations
Tuesday, September 21, 2010
LANDSCAPE SHOOTING

Today you are taking pics, your goal is to have a total of 40 good pics. make sure they have for/mid/background.
Monday, September 20, 2010

Thursday, September 16, 2010

Landscape Schedule

Thursday: editing - cropping, selecting, adjusting.
Weekend: Your weekend homework is to shoot at least 12 landscapes from a minimum of 2 locations. Remember to follow our compositional guidelines.
Monday: in class work day
Tuesday: all day shooting day, come with a plan of what/where you are going to take pics!!! How are you going to get there? parents? bus? walk?
Thursday: editing day, Landscapes are due.
Tuesday, September 14, 2010
taking pics
Landscape Practice:
- find 10 interesting landscapes
- shoot each one TWICE
- once with the horizon centered
- once with the horizon up or down a third and with a foreground object off to the right or left.
be sure to turn in...
- your camera drawing & notes
- show me your camera
- your academic plan and check out form
Landscapes


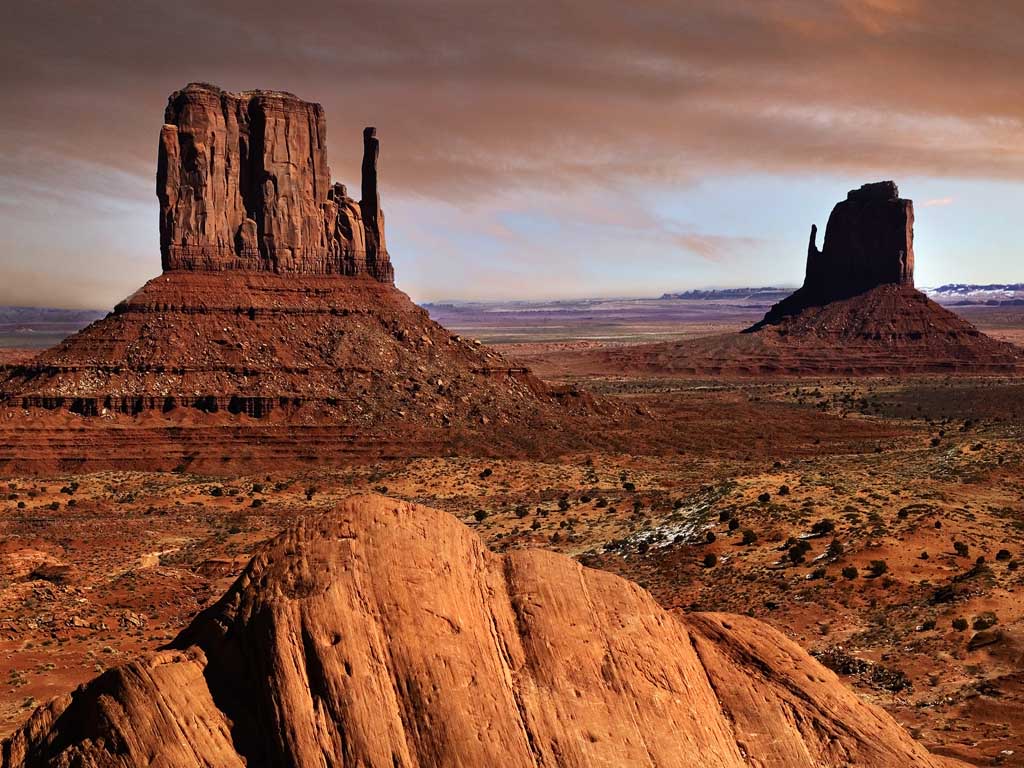
Landscape comprises the visible features of an area of land, including physical elements such as landforms, living elements of flora and fauna, abstract elements like lighting and weather conditions, and human elements like human activity and the built environment.

Please do not center the horizon line and try to show something in the foreground, mid-ground, and background.
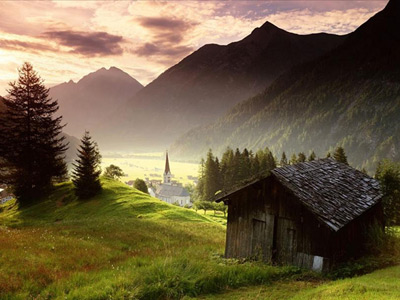
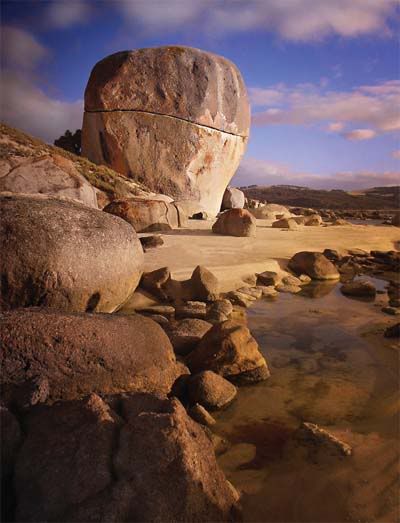
The trick to landscapes is to show depth:
the secret to getting your images to show depth is to include for/middle/background all in the same image. Let it lead the viewer from something up close to things far away... similar to the leading lines we just shot.
epic examples:
http://www.outdoor-photos.com/
The rule of thirds:
- an image can be divided into nine equal parts by two equally-spaced horizontal lines and two equally-spaced vertical lines. The four points formed by the intersections of these lines can be used to align features in the image. aligning a photograph with these points creates more tension, energy and interest in the photo than simply centering the feature would.
 This photograph of a sunset taken in the Thousand Islands region demonstrates the principles of the rule of thirds

Monday, September 13, 2010

Thursday, September 9, 2010
Getting to know your camera

Today we are going to get to know our cameras! To do so we are going to do two things:
- Google your camera in search of an instruction manual.
- Draw a picture of your camera and label the following items:
- power button
- shutter release button
- zoom
- lens
- viewfinder and/or display
- function dial or menu - and what is on it? what do the symbols stand for?
- timer
- flash control (manual on off etc)
- white balance
- USB input/out
- 4 other things specific to your camera
more on composition...
Class work and homework
This is not a writing intensive course, but there is some reading the first couple weeks of class.
Please take notes on the bold faced words as you read from the links below. You will be shooting the various composition elements this weekend and next week. We will also have a quiz on this material as well.
Thursday's Reading (homework if not completed in class):
Two links about composition:
http://www.microsoft.com/windowsxp/using/digitalphotography/learnmore/composition.mspx
http://photoinf.com/General/Geoff_Lawrence/Composition.html
Weekend Homework: due Monday
pick two compositional techniques you have read about and take 3+ pictures of each. (i.e. 3 leading lines and 3 frame within a frame). Each image should be of a new/different subject.
Photos from semesters past...
http://abbyphotoblog.weebly.com/
http://dbmagaoay.weebly.com/
http://livsphotos.weebly.com/
http://iystealthyi.weebly.com/
http://lilboiblue.weebly.com/
http://throughmyeyesisee.weebly.com/
http://gwil.weebly.com/
http://katleiahramos.weebly.com
http://www.elliotfisher.weebly.com/
http://kylesullivan.weebly.com/
http://rhphotographer.weebly.com
http://acaelynphotos.weebly.com/
http://photographybyklara.weebly.com/index.html
http://etleyphotography.weebly.com/
http://dbphotoz.weebly.com/index.html
http://soyindia.weebly.com/
http://zrob.weebly.com/
http://kathrynhedges.weebly.com/
http://Quinnsullivan.weebly.com/
http://kymorrisphotog.weebly.com/
http://sierraalef.weebly.com/
http://benphoto.weebly.com/
http://eirameitak.weebly.com/
http://christopherbartl.weebly.com/
http://tegansullivan.weebly.com/
http://stephanmakesmagic.weebly.com/
http://picturesfortheworld.weebly.com/
http://brewski.weebly.com
http://adamzero.weebly.com/
http://jphoto92.weebly.com/
http://mackenziewisdom.weebly.com/
Take a look at ALL of these... find an image you LOVE LOVE LOVE. Why do you like it? What stands out? How is it composed? What makes it amazing?
Tuesday, September 7, 2010
Editing your angles pics
We want to work with 6 adjustments under IMAGE > ADJUSTMENTS >


the lasso tools and the magnetic wand.
- hue/saturation
- curves
- brightness/contrast
- exposure
- shadow/highlight
- Color Balance


the lasso tools and the magnetic wand.
HOW TO MAKE A CONTACT SHEET

In Photoshop CS3:
* Create a new folder on your desktop with your pictures.
* Open Photoshop CS3.
* Select File>Automate>Contact Sheet II
* Select on Folder and choose the folder your created.
* Make sure the image size is 8*10 inches.
* The resolution should be 300.
* Columns=3 and rows=5.
* Click OK.
* File>Save as a jpeg
Friday, September 3, 2010
taking pics!!!


Today you will shoot pictures!!! We are seeking unique images, creative compositions, fantastic images. You will have a partner to share your camera with and each of you should try and take 10-15 images! Keep the camera on auto.
Thursday, September 2, 2010
Viewpoint

The unusual viewpoint of this photo makes for an interesting composition. Image by dollie_mixtures.
Before photographing your subject, take time to think about where you will shoot it from. Our viewpoint has a massive impact on the composition of our photo, and as a result it can greatly affect the message that the shot conveys. Rather than just shooting from eye level, consider photographing from high above, down at ground level, from the side, from the back, from a long way away, from very close up, and so on.
Subscribe to:
Posts (Atom)