Thursday, September 29, 2011
HOMEWORK!
You need 60+ Landscape pics by Monday from 5+ locations. Get out this weekend and shoot tons of pics! Have fun with it, go to the beach, go on a hike, drive into the hills, find nice pics!
Be SURE every landscape has a FOREGROUND!

Your foreground should be in focus, interesting, and act as an anchor to give your image depth and context. Look for interesting foreground objects to make for amazing landscapes!
Landscape Shooting
Today you will be taking Landscape pics. You will need 60+ Landscapes by Monday. These need to come from 5 different locations. You will have the whole period today as well as this coming weekend.
Keep in mind:
Keep in mind:
- look for F/M/B.
- Horizon Line
- Depth
Tuesday, September 27, 2011


Shooting for today
We are looking for Landscapes. You need to find 5 landscapes. Each must include:
- a horizon line
- a foreground (most important, the anchor!), midground, and background
- follow the rule of thirds, nothing should be centered.
- be interesting!
More on Landscapes
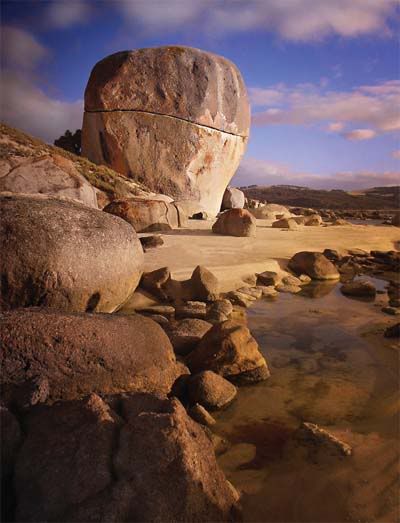
Landscape comprises the visible features of an area of land, including physical elements such as landforms, living elements of flora and fauna, abstract elements like lighting and weather conditions, and human elements like human activity and the built environment.
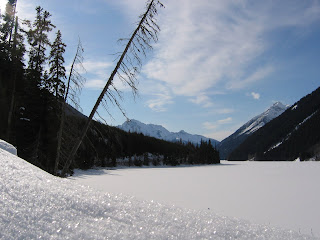
Please do not center the horizon line and try to show something in the foreground, mid-ground, and background.
The trick to landscapes is to show depth:
the secret to getting your images to show depth is to include for/middle/background all in the same image. Let it lead the viewer from something up close to things far away... similar to the leading lines we just shot.
epic examples:
http://www.outdoor-photos.com/
please find one EPIC landscape image you like and fits with the rules we have talked about. Post a link to it here:
http://learn.shorelineschools.org/shorecrest/bstory/index.php?section=discussion&threadID=28405
Landscape Tips

Here are some surefire tips to help our landscapes... please read these, pick a tip you think is most advantageous.
Thursday, September 22, 2011
Turn In
A folder containing your
- edited pics
- named your name_edits
- put in classes folder
Making a Contact Sheet

In Photoshop CS3:
* Create a new folder on your desktop with your pictures.
* Open Photoshop CS3.
* Select File>Automate>Contact Sheet II
* Select on Folder and choose the folder your created.
* Make sure the image size is 8*10 inches.
* The resolution should be 300.
* Columns=5 and rows=6.
* Click OK.
* File>Save as a jpeg
Monday, September 19, 2011
For your first shooting assignment
You are going to be taking tons of pictures on Tuesday/Wednesday. your goal is to seek out interesting images for each of the 3 compositional techniques you selected.
For each of your 3 techniques you need:
For each of your 3 techniques you need:
- 3 different scenes or locations
- 10 different angles/perspectives
- a variety of ideas
- 30+ images that are all different, creative, unique, interesting and in focus. Each image should depict the selected compositional technique. We will edit these pics then, please do not edit pictures on your camera.
Getting to know your camera
In an attempt to learn a little about how your cameras work, we are going to work on learning their parts and what they do today. One way we will do this is by drawing your camera and labeling some of its parts:
We want to find the following parts:
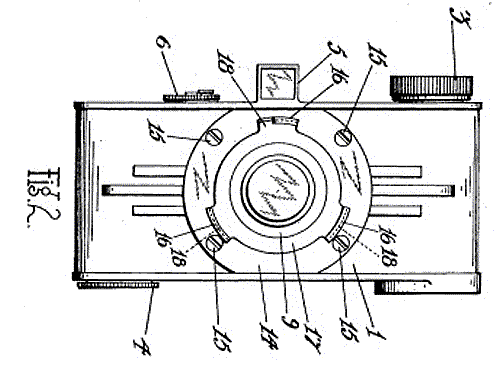
We want to find the following parts:
- lens
- shutter release
- power
- zoom
- option - pre set items like macro, landscape, night, movie, etc
- viewfinder/display screen
- timer
- card slot
- functions - what can you adjust in your menu or function settings? how manual is your camera? Does it offer shutter or aperture priority?
Thursday, September 15, 2011
your 3 picks
http://learn.shorelineschools.org/shorecrest/bstory/index.php?section=discussion&threadID=30590
photoshop tools part #1

Rectangular Marquee Tool (M)
Use this tool to make selections on your image, in a rectangular shape. This changes the area of your image that is affected by other tools or actions to be within the defined shape. Holding the [Shift] key while dragging your selection, restricts the shape to a perfect square. Holding the [Alt] key while dragging sets the center of the rectangle to where your cursor started.

Move Tool (V)
Use this tool to, well, move things. Usually you use it to move a Layer around after it has been placed. Hold the [Shift] key to limit the movements to vertical/horizontal.

Polygon Lasso Tool (L)
Ok, this should be the Lasso Tool, but I use the Polygon Lasso a lot more often. Use this to draw selections in whatever shape you would like. To close the selection, either click on the beginning point (you’ll see the cursor change when you’re on it), or just double-click. When holding the [Ctrl] key, you’ll see the cursor change, and the next time you click, it will close your selection.

Magic Wand Tool (W)
Use this to select a color range. It will select the block of color, or transparency, based on wherever you click. In the Options Bar at the top, you can change the Tolerance to make your selections more/less precise.

Crop Tool (C)
The Crop Tool works similarly to the Rectangular Marquee tool (see above if you have no short-term memory). The difference is when you press the [Enter/Return] key, it crops your image to the size of the box. Any information that was on the outside of the box is now gone. Not permanently, you can still undo.

Clone Stamp Tool (S)
This is a very useful tool, if used wisely. Choose your brush size, then while holding down the alt/option key on the keyboard, click on the area you want to clone, release the alt/option key and now click and drag over the area you want to replaced. It’s a direct copy of the information from the first selected area to the second.
composition part #2
The only rule in photography is that there are no rules. However,
there are many composition guidelines which can be applied in almost
any situation, to enhance the impact of a scene. Below are ten of the
most popular and most widely respected composition 'rules'.
 Notice how the building and horizon are aligned along rule-of-thirds lines. Image by Trey Ratcliff.
 Here, the visual 'weight' of the road sign is balanced by the building on the other side of the shot. Image by Shannon Kokoska.
 The road in this photo draws your eye through the scene. Image by Pierre Metivier.
 The symmetry of this chapel is broken by the bucket in the bottom right corner. Image by Fabio Montalto.
 The unusual viewpoint chosen here creates an intriguing and slightly abstract photo. Image by ronsho.
 The plain background in this composition ensures nothing distracts from the subject. Image by Philipp Naderer.
 Emphasise your scene's depth by including interesting subjects at varying distances from the camera. Image by Jule Berlin.
 Here, the surrounding hills form a natural frame, and the piece of wood provides a focal point. Image by Sally Crossthwaite.
 Cut out all unnecessary details to keep keep the viewer's attention focused on the subject. Image by Hien Nguyen.
 Digital photography allows us to experiment with different compositions until we find the perfect one. Image by Jule Berlin.
Composition in photography is far from a science, and as a result all
of the 'rules' above should be taken with a pinch of salt. If they
don't work in your scene, ignore them; if you find a great composition
that contradicts them, then go ahead and shoot it anyway. But they can
often prove to be spot on, and are worth at least considering whenever
you are out and about with your camera.
Digital photography allows us to experiment with different compositions until we find the perfect one. Image by Jule Berlin.
Composition in photography is far from a science, and as a result all
of the 'rules' above should be taken with a pinch of salt. If they
don't work in your scene, ignore them; if you find a great composition
that contradicts them, then go ahead and shoot it anyway. But they can
often prove to be spot on, and are worth at least considering whenever
you are out and about with your camera.
Rule of Thirds
Imagine that your image is divided into nine equal segments by two vertical and two horizontal lines. Try to position the most important elements in your scene along these lines, or at the points where they intersect. Doing so will add balance and interest to your photo. Some cameras even offer an option to superimpose a rule of thirds grid over the LCD screen, making it even easier to use. Notice how the building and horizon are aligned along rule-of-thirds lines. Image by Trey Ratcliff.Balancing Elements
Placing your main subject off-centre, as with the rule of thirds, creates a more interesting photo, but it can leave a void in the scene which can make it feel empty. You should balance the 'weight' of your subject by including another object of lesser importance to fill the space. Here, the visual 'weight' of the road sign is balanced by the building on the other side of the shot. Image by Shannon Kokoska.Leading Lines
When we look at a photo our eye is naturally drawn along lines. By thinking about how you place lines in your composition, you can affect the way we view the image, pulling us into the picture, towards the subject, or on a journey 'through' the scene. There are many different types of line - straight, diagonal, curvy, zigzag, radial etc - and each can be used to enhance our photo's composition. The road in this photo draws your eye through the scene. Image by Pierre Metivier.Symmetry and Patterns
We are surrounded by symmetry and patterns, both natural and man-made., They can make for very eye-catching compositions, particularly in situations where they are not expected. Another great way to use them is to break the symmetry or pattern in some way, introducing tension and a focal point to the scene. The symmetry of this chapel is broken by the bucket in the bottom right corner. Image by Fabio Montalto.Viewpoint
Before photographing your subject, take time to think about where you will shoot it from. Our viewpoint has a massive impact on the composition of our photo, and as a result it can greatly affect the message that the shot conveys. Rather than just shooting from eye level, consider photographing from high above, down at ground level, from the side, from the back, from a long way away, from very close up, and so on. The unusual viewpoint chosen here creates an intriguing and slightly abstract photo. Image by ronsho.Background
How many times have you taken what you thought would be a great shot, only to find that the final image lacks impact because the subject blends into a busy background? The human eye is excellent at distinguishing between different elements in a scene, whereas a camera has a tendency to flatten the foreground and background, and this can often ruin an otherwise great photo. Thankfully this problem is usually easy to overcome at the time of shooting - look around for a plain and unobtrusive background and compose your shot so that it doesn't distract or detract from the subject. The plain background in this composition ensures nothing distracts from the subject. Image by Philipp Naderer.Depth
Because photography is a two-dimensional medium, we have to choose our composition carefully to conveys the sense of depth that was present in the actual scene. You can create depth in a photo by including objects in the foreground, middle ground and background. Another useful composition technique is overlapping, where you deliberately partially obscure one object with another. The human eye naturally recognises these layers and mentally separates them out, creating an image with more depth. Emphasise your scene's depth by including interesting subjects at varying distances from the camera. Image by Jule Berlin.Framing
The world is full of objects which make perfect natural frames, such as trees, archways and holes. By placing these around the edge of the composition you help to isolate the main subject from the outside world. The result is a more focussed image which draws your eye naturally to the main point of interest. Here, the surrounding hills form a natural frame, and the piece of wood provides a focal point. Image by Sally Crossthwaite.Cropping
Often a photo will lack impact because the main subject is so small it becomes lost among the clutter of its surroundings. By cropping tight around the subject you eliminate the background 'noise', ensuring the subject gets the viewer's undivided attention. Cut out all unnecessary details to keep keep the viewer's attention focused on the subject. Image by Hien Nguyen.Experimentation
With the dawn of the digital age in photography we no longer have to worry about film processing costs or running out of shots. As a result, experimenting with our photos' composition has become a real possibility; we can fire off tons of shots and delete the unwanted ones later at absolutely no extra cost. Take advantage of this fact and experiment with your composition - you never know whether an idea will work until you try it. Digital photography allows us to experiment with different compositions until we find the perfect one. Image by Jule Berlin.composition basics
Position your subject |
 Photographing the woman slightly off-center creates a more interesting photo. | The perfect way to make photos more interesting is to use the rule of thirds:
|
Get closer to your subject |
 Getting closer allows you to capture the details and expressions of your subject. | The simplest technique for getting better photos: Get closer to your subject.
|
Crop your photo |
 Cropping the legs from this photo instantly transforms it from a snapshot to a frameable portrait. |
You won’t always get that perfect shot to begin with. Keeping the
rule of thirds in mind, try cropping your photo after you’ve shot it,
either in your camera or with photo-editing software.
|
Choose better photo backgrounds |
 An intricate background works well for subjects with simple or no patterns. |
Be sure the background of your photo doesn’t interfere with your
subject and take attention away from the focal points.
|
Pick the proper orientation |
 While both images showcase the reflection, the horizontal one also captures the river’s beautiful surroundings. |
Your camera produces a rectangular image. This gives you two
distinct orientations to work with—vertical or horizontal.
|
Use point of view |
 Instead of a traditional, head-on portrait, try an over-the-shoulder shot. | Break from the habit of shooting everything from eye level.
|
Frame your subject |
 An archway serves as a great natural frame for the subject—the building. |
Framing is what draws the viewer’s eye to the main subject.
Creative ways to frame your subject are everywhere!
|
Experiment with abstract photography |
 A close-up of beach pebbles is pleasantly punctuated by a seed pod’s shot of color. |
A fun way to learn more about basic photo composition is to zoom
in on abstract details. The purpose is to make a work of art rather
than show the object in a realistic way.
|
Subscribe to:
Posts (Atom)